
Well, 2020 has certainly turned out to be interesting. I have spent most of the year, working from home and not traveling. This has allowed me more time to work in the garden.
The most significant event this year was expanding the main railroad. Due to our septic field, we are limited to where we can expand the garden. I added approx. 100' to each mainline, as well as added a small yard and reverse loop. We also made a small "fairy garden" for Lorrie.
I have continued to work on my buildings for the Grand Canyon themed area. As mentioned in our 2019 update, my 3D printer has really helped move these projects along.
Several years ago, I wired most of our railroad equipment for battery operation, not having to rely on "track power". I am finding that many of my batteries have reached the end of the useful life, and therefore, I have decided to switch back to track power. So during the expansion, I have been installing "under track" wiring, that connects to the rails approximately every 10'. I still need to pull in the "home run" wiring back to my shed, where our power supply is, but in the long run, I think this will work better for me. Even with the battery power, my trains could not run continuously for an entire open house event, so using track power will give me that capability. Luckly, we installed 4" PVC piping under all parts of the garden, to make this task much easier.
After 10 years of service, we decided it was time to replace the exterior sheathing on our train shed. This time, we used marine grade plywood, primed and painted all surfaces and edges, prior to assembling. We hope it will last a few years.
Click on each thumbnail image below to see an larger image.
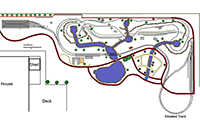
| This is an updated plan of the garden, showing the expansion on the right side, where the elevated track is.
| 
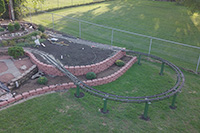
| | This aerial view from my drone shows the expansion area, with a 50' long double track steel bridge that I designed and built.
| 
| | I built the bridge in our front driveway on a wood template. I used 800 pounds of steel. Each wood stud provided the location of the steel post that the bridge sits on.
| 
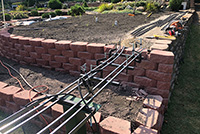
| | This is the connection between the bridge and the garden. I notched the retaining wall blocks to allow the tracks to have a smooth, level transition from the bridge into the garden. The new yard is being laid in the upper right.
| 
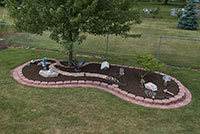
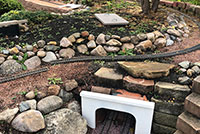
| | This is Lorrie's new fairy garden. Since this photo was taken, we installed the track in a meandering "dog bone" shape.
| 
| | I did finally tearout and replace our third tunnel, now using clay chimney piping. This tunnel is my longest at 14', so I added a access hole.
| 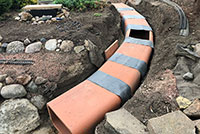
| | This is the finished product.
| 
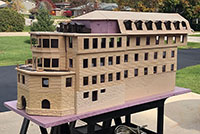
| | The south wing of the El Tovar hotel is coming along. The bottom floor is made of precision board and will be partially buried into the garden. This portion of the building measures 66" long by 28" high. There is a "north wing" of simular size, and the central core of the building which is the main lobby and dining room. When completed, my model will be over 14' in length by nearly 36" tall. I am building it in 5 pieces, for ease of movement and storage.
| 
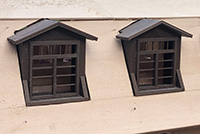
| | I designed and printed the dormer frames on my 3D printer. Each dormer is actually 5 pieces that are glued together. I will apply wood shingles to the exterior of each to match the actual hotel. The printing saved countless hours as compared to building piece by piece. I need 30 dormers to complete the hotel.
| 
| | Our trainshed with new siding.
| 
|


|